

Paver Laying
Ketley Clay pavers should be laid in accordance with BS 7533-3:2005+A1:2009.
RIGID PAVEMENT CONSTRUCTION
Rigid fixing of pavers is the traditional method of laying and offers benefits in certain applications. The mortar joint can be used to complement or contrast adjacent brickwork. The joints can be used as a feature by the use of coloured mortars. It can also provide structural strength in areas subject to high volumes of water or frequent high pressure water hosing.
BASE REQUIREMENTS
Generally the base for rigid paving will be concrete, either plain or reinforced. The composition and thickness is dependent on structural design considerations but typically will be 100-150mm thick.
MORTARS
When pavers are fixed rigidly the mortars used for jointing and bedding must have a sufficiently low permeability and adequate cement content to ensure good frost resistance. In general only 1 : 3 cement : sand mix, or 1 : 1⁄4 : 3 cement : lime : sand should be used. It is recommended that a tooled, slightly dished joint profile referred to as “bucket handle” is specified. This method helps to seal the surface of the joints and presses the mortar against the pavers.
MOVEMENT JOINTS
When pavers are laid in the rigid format it is essential to provide adequate movement joints. Perimeter joints should be provided around rigid paved areas if any dimension of the paved area exceeds 6 metres, and thereafter at approximately 6 metre intervals. In addition movement joints should be provided around fixed points of restraint such as manhole covers, columns and upstands. Where there is a movement joint in the concrete base this should be carried through to the surface. Movement joints are usually 10mm wide and should comprise of a compressible joint filler, such as polyethylene foam, a barrier (or joint breaker) and an extensible tack free sealant.
CLEANING
During construction great care must be taken to avoid cement staining of the paver faces. Any cement or lime stains may be removed by the careful use of proprietary brickwork cleaners which are based on dilute hydrochloric acid solution. These should be used in accordance with the manufacturer’s health and safety recommendations. It is important to saturate the surface with clean water before applying cleaning agents. A rigid pavement does not become fully mature for approximately 28 days after laying. Therefore it is recommended that trafficking must be delayed until after that time. For external paving sweeping is the only “routine” maintenance required but in damp and shaded areas a suitable weedkiller may be required to treat moss and algae growth. Internal paving can be cleaned using a mild detergent and warm water.
FLEXIBLE PAVING
In the 1970’s the long practiced continental technique of flexible paving came to the UK. It has grown strongly since then and has now become the most widely used method of laying clay pavers. The method of constructing a flexible pavement is straightforward. Pavers are placed upon a bed of uniform thick sharp sand within form edge restraints, over a prepared, sub-base. Sand is brushed into the joints and the paved construction is compacted by several passes of vibrating plate compactor.
The stability of paved areas is provided by frictional restraint of the sand grains in the joints. Applied loads on one paver are transferred to adjacent pavers; an effect known as interlock. Their speed of construction and their ability to be trafficked immediately upon completion make them popular with specifiers and contractors alike. Flexible clay pavements can withstand heavy traffic loadings and are resistant to contaminants.
PERFORMANCE
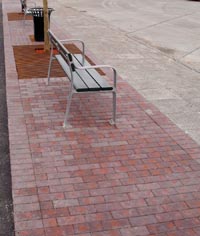
Flexible clay pavements provide excellent long term performance when care is taken in the structural design and construction of the underlying layers and the wearing surface. Reference should be made to BS7533 -2: 2001 Guide for the structural design of lightly trafficked pavements constructed of clay pavers or precast concrete paving blocks and BS7533 - 3: Part3: 1997 Method for Construction of Pavements. If excavation is required, such as laying of cables, pavers can be uplifted and reinstated once the work has been completed.
Clay pavers out perform concrete block pavements because they have a permanent through colour which does not fade. Clay pavers can also shrug off stains. In trafficked locations tests indicate that a 65mm thick clay paver will perform in an equivalent manner to an 80mm concrete block.
SUB-BASE DESIGN
The thickness of the sub-base is dependent upon the type and amount of traffic to be carried by the paved area, and the likelihood of the underlying subgrade to deform in use. To establish this factor a knowledge of the Californian Bearing Ratio (CBR) is necessary. Reference should be made to BS 7533 parts 1 & 2. If the sub-base is likely to be prone to frost then the sub-base should be adjusted to give a total pavement thickness of not less than 450mm. Wherever practicable the water table should be prevented from rising to within 600mm of the pavement surface. This can usually be achieved with the installation of subsoil drainage. The sub-base drain should be laid at low points below the level of the sub-base and perforated or open jointed pipes should be used. These should then be wrapped with a suitable filter fabric known as geotextile. Where there is no roadbase, the surface of the compacted sub-base should be close textured to prevent migration of sand from the bedding course. It may be necessary to use “binding” materials to achieve this. The final compaction of the sub-base should be in accordance with the recommendations of BS 7533.
ROADBASE DESIGN
For lightly trafficked paved areas a roadbase is not normally required, provided that they are not expected to carry more than 0.5 million standard axles over their design life. Where vehicle use is greater than this, or if the paved area is subject to channelised or constantly turning traffic then a roadbase should be constructed in accordance with BS 7533 - 2. BS7533: 2001 requires that the roadbase should be levelled so that its surface level does not differ from the design level by ± 15mm.
THE BEDDING COURSE
There are two main methods of constructing the sand bedding course, precompaction and compaction after placing the pavers. It is now widely accepted that the precompaction method should be used. For each site the bedding course sand should be obtained from a single source in order to maintain consistency. If the sand is stored it should be sheeted, to prevent saturation and to help maintain a uniform moisture content.
A method of laying the bedding course is as follows:
1. The suitability of the road base or sub base should be checked. Consideration should be given to the use of waterproofing or overlay with a suitable geotextile.
2. Sand is spread in a loose uncompacted layer.
3. Screeding boards or rails are set up on site and the area is roughly screeded to a depth of 40-50mm.
4. The sand bedding course is then compacted with two to three passes of a vibrator. The thickness of the uncompacted sand to achieve the finished surface profile after compaction needs to be established by trial and error at the start of the operation. As a guideline the uncompacted layer of sand will be approximately 15mm more than the desired finished compacted thickness. When compacted the bedding course sand should ideally be 30-35mm and no more than 50mm.
5. After initial compaction a further thin layer of sand of approximately 10mm is placed and screeded. This provides a loose surface on which the clay pavers can be placed. It is recommended that at the end of the working day, the boundary of bedding course sand left should not exceed one metre beyond the laying course.
PAVER LAYING
It is useful to plan the layout of pavers before full scale laying begins. It may help to minimize the number of pavers that need to be cut. It will help to identify the likely sand surcharge needed in setting levels. It will also indicate the likely finished appearance and the standard of on-site workmanship.
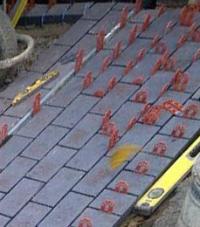 Clay pavers should be laid by hand, commencing from a straight starting edge on the prepared bedding course. They should be laid slightly open to provide a finished joint width between pavers of approx 2-5mm beyond the edge protection nibs to permit infill and to minimise damage in compaction and subsequent use. Failure to do this may result in chipping of the clay pavers.
Ketley pavers can be supplied with or without nibs. (Please note the nibs are there for edge protection of the pavers and are not spacer nibs, therefore the nibs should not be used to determine the gaps between pavers). If deviation from the bond pattern does occur, the pavers can be adjusted to open the Joints to about 5mm. This process is known as gapping. A small percentage outside this figure will not affect paver performance.
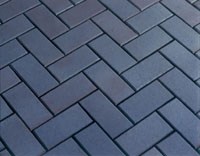
When a 90° herringbone bond pattern is used, a string line should be set up at right angles to the starting edge, and a "nose" of paving can then be advanced along it. When laying 45° herringbone pattern the laying face should develop parallel to the starting edge.
 Pavers should be selected from three or more packs to ensure a thorough mix. If stocks of new pavers have to be laid on new work, they should be stacked about one metre back from the leading laid edge.
As far as possible whole pavers should be used. Pieces of less than 1/3rd of a full paver should be avoided. Various items in the Ketley range of paver fittings overcome this problem. Infilling of boundaries and obstructions should be completed before vibration commences. Paver cutting should be carried out by a disc cutter, not by the use of a splitting machine or hammer and chisel.
 It is important to check the pattern of pavers against string lines as work progresses and adjust as necessary. Once a sufficient area of clay pavers has been placed, approximately 40m2 on larger sites, fine dry sand should be brushed into the joints.
After brushing into the joints, surplus sand should be brushed away before compaction begins. Pavers should then be compacted into position by two or three passes of a vibrating plate compactor fitted with a neoprene pad. As recommended in BS7533-3:2005, the plate area should be at least 0.20m2. it should transmit an effective force of 50-75 :kn/m2 at a vibration frequency of between 60-IOOHz. Compaction should not be performed closer than one metre from any unrestrained edge.
 Further sand should then be applied and the procedure repeated. After final compaction 1-2mm of sand can be spread over the paved area to promote joint fitting and to fill any voids which may develop.
Commencement of use of the pavement may need to be delayed if the bedding course is saturated following heavy rain. During the early life of the pavement there is likely to be some settlement of sand within the joints. Therefore the site should be monitored and arrangements made for further sand to be brushed in, to top up the joints.
EDGE RESTRAINTS FOR PAVED AREAS
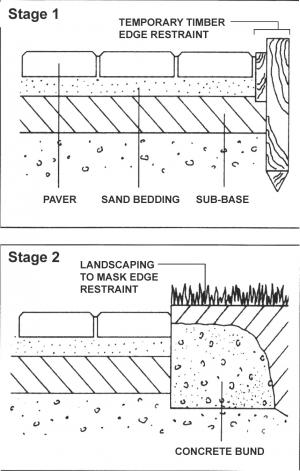 Rigid edge restraints must be provided for all flexible clay paved areas. Edge restraints protect against the loss of bedding course material and restrict pavers from lateral movement. Edge restraints can be provided either by existing features such as walls or concrete slabs, or by purpose made kerb fittings. They should be adequate to support overriding by traffic. Concrete haunching should be provided at the rear of the edge restraint in order to resist lateral movement. No haunching should be provided to the front of the edge restraint. Concrete must be properly set before vibration of the pavers. Movement joints should be provided at approximately six metre centres using the line of edge restraint. If the edge restraint is required to be hidden, a temporary timber support should be used which can be replaced by a concrete bund after the pavers have been fully compacted. This should be recessed below the level of the clay pavers in order to permit subsequent landscaping to hide the restraint.
ADDITIONAL LAYING REQUIREMENTS
DRAINAGE All types of paver installation need effective drainage for surface water. To achieve a satisfactory run off it is recommended that longitudinal gradients should not be less than 1 : 100, and that cross falls should be approximately 1 : 40. For large areas of pavements it may be necessary to include drainage provision within the pavement itself. Ketley provide drainage units which are compatible with standard metal gully outlets. Flexible pavements may allow water to penetrate the surface and therefore consideration should be given to drainage of the underlying formation. Drainage of the bedding course can be achieved by sub-base drains which should be laid at the low points below the level of the sub-base using perforated or open joint pipes. A free draining geotextile should be used to prevent the loss of bedding sand.
ACCESS COVERS
The sitting of inspection covers is important to preserve the aesthetics of a paved area. Covers must be sited with some care, located within an area of paving and aligned with the pattern. They should not straddle different colours or patterns. Recessed covers inserted with matching pavers are desirable as they are less intrusive although it is likely that pavers will need to be cut to fit. In rigid paved areas movement joints should be provided around covers.
GRADIENTS
As a general guide, flexible pavements can be laid to a maximum slope of 1 in 10. For steeper gradients rigid paving should be used. Paver laying should always commence at the bottom of the gradient and provision for bedding course drainage should be made at this point. For gradients in excess of 1 : 20 consideration should be given to the use of an acrylic pre polymer to prevent the wash out of jointing sand. It may be necessary to break up flexible paving into shorter lengths, say 10m on slopes with the use of rigid restraints, in order to prevent the creeping action of pavers and sand down the slope.
STEPS
Riser height of steps is usually between 100 - 175mm. Each step should feature a fall to the nose - approximately 6mm to clear surface water. Experience suggests that the square edges of standard bricks are vulnerable to damage and that large radius bullnose bricks are not recommended from a safety viewpoint. Therefore the Ketley specials range includes a tight radius nosing as a special feature for steps.
For post laying care, download our guide here Download industry guidance on paver cleaning here